Microsoft 365 (formerly Office 365) desktop applications are ubiquitous in the modern workplace. It is pretty much a given that any endpoint manager will have to deploy and manage it. Thankfully, Microsoft offers multiple ways to deploy and tame this process.Office Deployment ToolThe best place to start in understanding M365 packaging and deployment is the Office Deployment Tool. There are two components to this: the EXE and the XML which need to be in the same folder. Understanding the XML components will help you ensure you do not deploy something that is not properly configured.
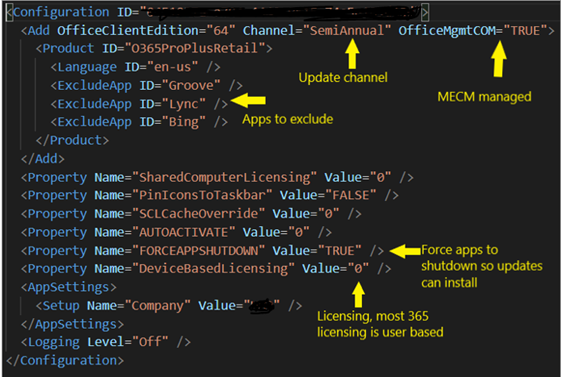
Sample XML with key components labeled.
A few of the XML components:
ExcludeApp: If nothing is excluded all apps will be installed.
Channel: Set this to whatever your enterprise prefers. The current choices are: Current Channel, Monthly Enterprise Channel, Semi-Annual Enterprise Channel. Make sure that when you deploy Visio or Project the XML configuration matches the existing update channel.
OfficeMgmtCOM: This will take some pre-planning. If MECM will not be managing updates set to “FALSE”. Microsoft recommends letting 365 auto-update as a best practice. Refer to 365 Update Management section later in this article for guidance.
Note: The “Management of Microsoft 365 Apps for enterprise” GPO setting will win over this XML setting.
FORCESHUTDOWN: This is a controversial setting but if you set this to FALSE and the end-user never closes their 365 apps, the install or update will never occur.
Package and Deploy
Method 1: Manual
Create the configuration XML using the Office Customization Tool and save the configuration XML file to the same directory that you saved the Office Deployment Tool setup.exe. Then use Office Deployment Tool to download the payload from Microsoft using the following command line:
setup.exe /download configuration.xml
Deploy the application using the following command line:
setup.exe /configure configuration.xml.
Method 2: MECM
MECM includes a wizard which walks you through creating the package. This is just a GUI to create the configuration XML file and then run the Office Deployment Tool to download the payload. It is essential no different than Method 1, just less steps.
Step 1: In MECM browse to Software/Office 365 Client Management.
Step 2: Click “Office 365 Installer” (there is a big + icon).
Step 3: Select an empty UNC path.
Step 4: Click “Go to the Office Customization Tool” to create the configuration XML.
Tip: On Licensing and Activation make sure you Enable “Automatically accept the EULA”.
Step 5: When all settings are completed click “Review” then “Submit” to close the Office Customization Tool, then click next.
Step 5: Chose whether or not to deploy the application now then click “Next”. Make sure you test this on test devices before deploying to production.
Step 6: Complete the Microsoft Office 365 Client Installation Wizard. The status will show “Working” which means MECM is running the Office Deployment Tool setup.exe, in the background, using the configuration XML to download the payload.
Step 7: The created package is in the Software Library\Application Management\Applications root. Distribute the application to the Distribution Points and test deploy the application.
Method 3: Intune
Step 1: Browse to https://endpoint.microsoft.com/.
Step 2: Select the “Apps” blade on the left, then choose the Windows platform.
Step 3: Click “Add” then select the app type “Microsoft 365 – Windows 10”.
Step 4: Select appropriate settings in the wizard (architecture, channel, licensing, apps to include/exclude, etc) or paste the XML you created using the Office Customization Tool (Do NOT set OfficeMgmtCOM to “TRUE” unless you plan to manage updates with MECM.) . This is like the previous Methods in that you are making selections to create the configuration XML file to deploy with the Office Deployment Tool package that is created.
Step 4: On the “Assignments” tab you can chose to assign this to user or device groups now, or you can do this later. Be sure to test on test devices before deploying to production.
Step 5: Create the application.
Update Management
There are only two ways to manage M365 updates; with MECM or automatically from Microsoft. Microsoft recommends as a best practice to allow automatic updates, but some enterprises will choose to manage updates via MECM.
Manage with MECM
To enable 365 update management with MECM:
Step 1: On both the WSUS server and the Software Update Point (SUP) role under “Products”, check the “Office 365 Client” check box.
Step 2: In MECM browse to Software Library\Software Updates. Right click on “All Software Updates” and perform the “Synchronize Software Updates” action. After the sync is completed confirm that the applicable 365 updates synced under Software Library\Office 365 Client Management\Office 365 Updates.
Step 4: I recommend making a new ADR for 365 updates (instructions for this are out of the scope of this article). You can also right click on the desired 365 updates then download and deploy it directly to the desired collections.
Step 5: Browse to Administration\Client Settings. Right click on “Default Client Settings”. Under Software Updates set “Enable management of the Office 365 Client Agent” to “Yes”.
Step 6: Test 365 update deployment on test devices.

MECM Client setting to allow 365 update management.
Automatic Updates
By default, Microsoft 365 will automatically update unless the configuration XML, MECM, or GPO settings change that. If you want to move from MECM management to automatic updates you will need to change GPO settings to “Enable management of the Office 365 Client Agent” to “No”.
To enable M365 automatic updates:
Step 1: Download the latest Office ADMX templates and copy to domain controllers.
Step 2: In Group Policy Management create a new GPO for 365 updates with the following settings:
Computer Configuration\Policies\Administrative Templates\Microsoft Office 2016 (Machine)\Updates
Enable Automatic Updates = Enabled
Hide options to enable or disable updates = Enabled
Management of Microsoft 365 Apps for enterprise = Disabled
Update Channel = <channel>
Note: The “Management of Microsoft 365 Apps for enterprise setting” GPO will take precedent over the MECM client settings. If you plan to manage updates with MECM this GPO must be set to “Not Configured” or “Enabled”. Setting to “Disabled” will allow 365 to automatically update directly from Microsoft.

365 update management with MECM client settings set to “Yes” for management and GPO set to “Not Configured”.
Step 3: Link GPO to test OUs and confirm M365 automatically updates as expected.
Step 4: To confirm automatic updates are enabled, open any 365-desktop application, and browse to File>Office Account.
Step 5: After confirming automatic updates are working as expected, link the 365 GPO to all applicable OUs.

365 update management with MECM client settings set to No” for management and GPO set to “Disabled”.
Wrap-up
Well, there you have it; everything you need to know to deploy and manage the entire lifecycle of Microsoft 365 applications for Windows. The process has come a long way and is far simpler to manage than Office 2013 was.
 by
by